My loopy home charger tale
On the first of February 2020, hot off the heels of buying my first electric car, I proceeded to upgrade my energy supplier account to their EV charging tier.
Back then, they were for a limited time the only provider that would install a charger for free. The usual extortionate rates are about a grand, of which the ‘OLEV Grant’—also known as the Electric Vehicle Homecharge Scheme (EVHS)—provides 75% off the cost of purchasing & installing a home charging point, up to a maximum of £350.
Now, the car I bought came with a 3-pin socket charger that I could just run through the window to get a 3.6 kW charge. Having a new one installed, especially on a rental property, was by no means a necessity, but as it wouldn't cost me anything, I thought it was worth the convenience of charging at 7 kW and not having to mess about with windows.
For half a grand more—and in the unlikely case you are lucky to have a three-phase power supply—you could get a 22 kW charger. Now, that is what I would consider a real charger: not just marginally faster than what I can get from a socket. The 7 kW unit is basically a glorified power socket extension with a Type 2 connector; nevertheless, I went for it.
This is going to be a recollection of what followed, in the hope that it will help potential charger buyers make more informed choices and get an idea of the timescale and work needed from start to finish.
Step 0: Make sure you have smart meters if the installer requires it; it's sometimes a prerequisite, and a separate team handles that, so you can't have it all done in one go.
Step 1: Choose a charger (3.6, 7, or 22 kW) and decide between tethered or not. I advise tethered so you don't mess about with cables, and 22 kW if you can.
Step 2: Choose a location close to the power box. Take a photo of it and sketch where you want the box to be, taking more photos of access, etc.
Step 3: Send the photos to the installer and wait. I sent mine on 13 Feb and had a booking for an installer to do the work on 16 Mar.
Step 4: The EV charger installer arrives. They might need a separate team to upgrade the part that sits between your meter and your power supply; that took an hour or so, as it belongs to the power grid.
Step 5: Actual charger installation—connecting to your router, placing the charger, and connecting to the power—could take half a day. Mine was aborted halfway through.
So here comes the rub: even after all these steps and all this preparation, it turns out I had a "looped power supply." Quite common for terraced houses, it means the power cable does not run from your house to the street; instead, it runs from neighbour to neighbour to neighbour, then to the street at the end.
If you have a looped power supply, you can't have the charger installed unless the UK "Distribution Network Operator" (DNO) consents to a looped installation. Otherwise, the DNO needs to be called to dig up the street, disconnect you from your neighbour, and connect you directly to the street power line. This needs permission from neighbours and it is all done at your expense.
Now, I have no idea if a DNO will ever consent to a looped installation at all, or what the costs are to un-loop a power supply. All I know is that the purpose of sending the photos to begin with is to make sure the charger can be installed—which, by the looks of it, can be overlooked. So, long story short: make sure you don't have a looped power supply.
Here is the photo that I sent to my installer before they attended the property. Whether you can tell or not that it's a looped power supply, I don’t know; I suspect that if there are two cables going into the bottom part of the black box, then the supply is looped.
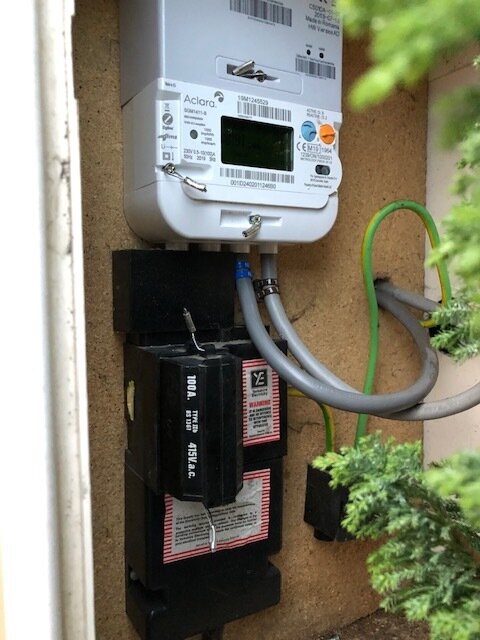
Top white box is the smart meter, bottom black box is the one owned by the grid
Long story short, I did not feel like a measly 7 kW charger was much use anyway, so I’m sticking to my portable charger that just plugs into a power socket. In a future post, I’ll detail my experience with it after a year of use.